|
MixBuss Installation and Setup Guide
Incorporating the MixBuss
into your existing studio is a fairly simple operation. In
essence you connect the outputs from each of your DAW interface
directly into the inputs on the MixBuss so that all of the
summing for the mix is done through the MixBuss itself instead
of being bounced down digitally to a stereo track inside
the DAW. This installation guide uses Cakewalk's Sonar
application with a Focusrite Saffire 26io firewire interface
as an example of how to properly interface the
MixBuss into a computer-based DAW environment.
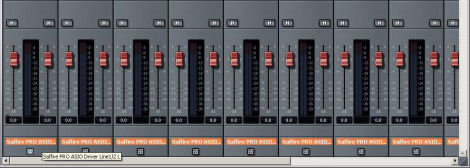
Connecting The Outputs
In this setup, each output pair from the Saffire is routed
to a pair of inputs on the MixBuss. Starting with the
analog outputs, Line 1/2 is connected to inputs 1 and 2,
Line 3/4 to inputs 3 and 4, etc. Since the Saffire
supports 2 ADAT lightpipe connections for up to 16 additional
outputs, we will only be using the first ADAT output for
this example. Therefore, the ADAT 1 outputs will be
set to inputs 9 through 16 on the MixBuss. The image
below shows how the outputs are assigned in Sonar. Please
note that all of the output faders for the interface are
set to 0dB for unity gain.
Click here to enlarge photo.
Calibrating The MixBuss
Now that we have the outputs connected, we need to ensure
that the level coming out of the MixBuss is the same as the
level going in. This requires us to set the Mix Level
output so that the incoming signal level is the same as the
output level that feeds your DAW inputs. You will need
a stereo -3db test tone signal which can be found here. Import
the calibration tone into a stereo track in your DAW and
assign it to the 1/2 outputs on your interface. This
will set the -3dB signal out to both the channel 1 channel
2 outputs on the DAW interface.
First we will check the input signal of channels 1 and 2. Set
the MixBuss channel 1-2 selector to "Stereo" so
that the channel 1 input signal is now panned full left
and the channel
2 input
selector is panned full right. This ensures
that the test tone signal is panned to full stereo exactly
as
it was
output
from the DAW. In order to set the output Mix Level,
we need to assign the MixBuss outputs to a stereo pair of
inputs on the interface. For this example, we will
use inputs 1/2 on the Saffire. Create an audio track
for the mix and set it to record enable so that you can monitor
the incoming signal level. The image below shows an
example of an armed input track for recording the MixBuss
output signal.
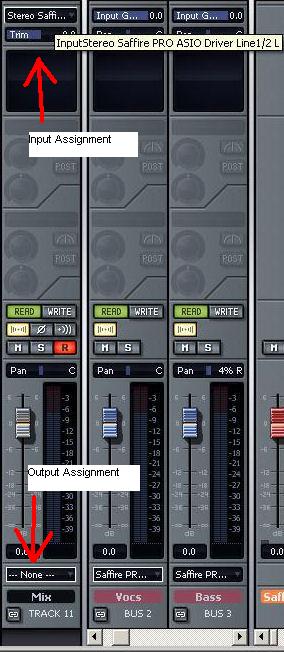
You will notice that the output assignment for this track
is set to none so that the incoming signal is not routed
to any outputs on the interface. This will avoid a
nasty feedback loop that could overload the circuits on your
interface, possibly damaging them in the process. With
the track now set to record enable, play back the test tone. As
the tone is being played back, turn the Mix Level volume
knob until the input meters in the record track read -3dB.
Once your meters read -3dB, you can disengage playback,
and the unit is now calibrated for unity gain.
Mixing With The MixBuss
Now that you have unity gain going from the DAW through
the MixBuss and back into the DAW, you can start mixing with
the unit. The easiest way to integrate
without requiring a lot of changes to your workflow and mix
methodology is to create what are called stems. A stem
is essentially a stereo submix of components in your mix,
like
overheads for drums, a stereo mix of toms, stereo guitars,
room mics, a drum submix, etc. Basically anything you
create within the DAW that can be assigned to stereo tracks
or groups
for mixdown can become a stem for summing. If you do
everything in the box, each stem will be assigned to the
master output
where everything is mixed down to a single stereo pair. When
summing externally, you assign each stem to a pair of inputs
on the summing buss. Once you have all the stems assigned,
you then arm a stereo track for recording in your DAW and
assign the outputs from the summing buss to your DAW inputs.
Now you can press record, and it will record the summed
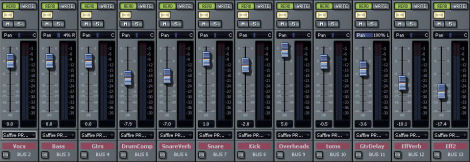
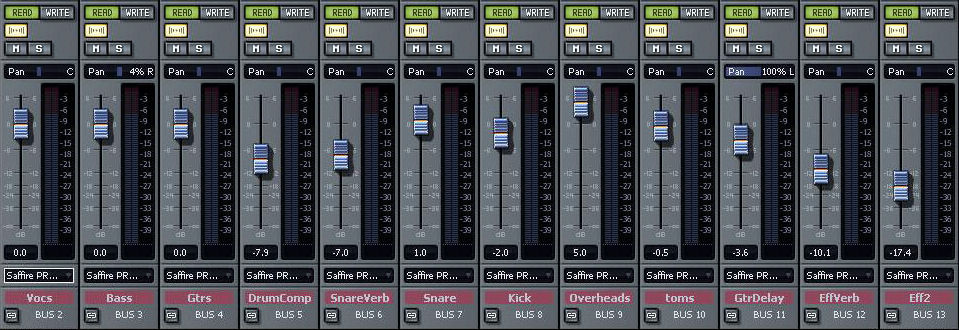
output from the MixBuss as the song plays back in realtime. Below
is an image of individual track assignments to stem outputs
in Sonar.

Click here to
enlarge photo.
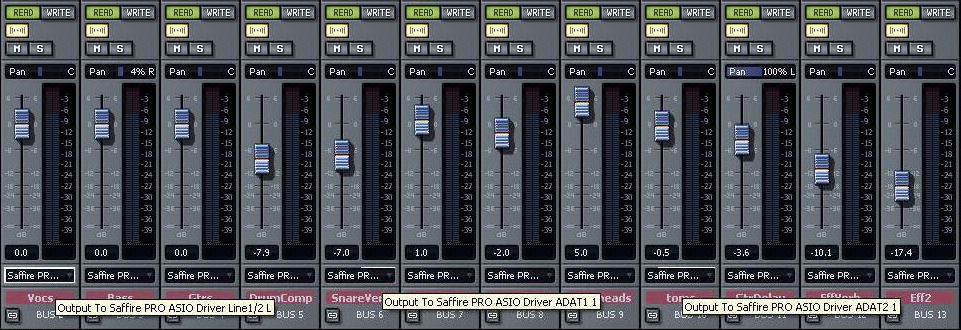
The images below show the stem group assignments to individual
interface outputs. These outputs are in turn connected
to the MixBuss inputs and provide the basis for the externally
summed mix.
Click here to
enlarge photo.
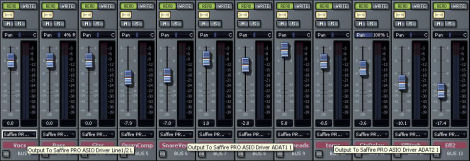
Click here to enlarge photo.
You can also take advantage of the mono selections on the
MixBuss for interface outputs that are panned center. For
example, if you have a snare top, snare bottom, kick drum
and vocal tracks, you can assign each of these tracks to
a single interface output and tie those outputs to either
the 1-2 or 3-4 inputs on the MixBuss with
"Mono" signal routing selected. This
ensures that the signal from the DAW goes through no internal
summing
calculations for panning before it is sent to the outputs
and can lead to a more up front sound for those tracks in
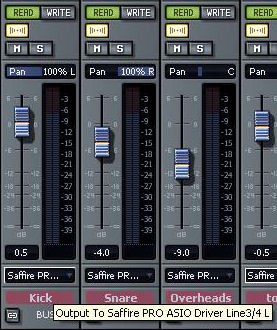
the mix. For those tracks that will be panned mono, you
need to assign the track output to a single side of the stereo
output pair on your interface. For example, if the kick
and snare are assigned to the interface outputs 3/4, then the
kick would be panned hard left and the snare panned hard right
so that the kick is assigned to interface 3 output only, and
the snare is assigned to interface 4 output only.
Then
on the MixBuss channels 3-4 are set to "Mono" with the selector
switch.
The image below shows a mono output configuration
in Sonar.
Finalizing The Mix
What you'll notice when mixing with the MixBuss is that
your mixes will improve in clarity and will probably require
you
to
tweak
the mix for the MixBuss summing. You may need to adjust your
stems outputs as a result, and this is quite common if the
mix has already been established for bouncing "in the box".
The best way to use the MixBuss is to do the mixes
with all of
your outputs assigned so that you're always monitoring off
the MixBuss outputs. If you set your mix up in the
box and get it to the point where everything is "right" and
then do your assignments to mix externally, you may notice
that the result is much different than what you hear from
the in the box summing. This is quite normal and is
part of the reason external summing is so popular. It
actually improves your mixes because it brings out elements
that get
lost during the internal summing. So as long as you
keep this in mind and expect to do some minor tweaking when
translating
the in the box mix to an externally summed mix, everything
will be fine. However, the best approach is to always
have your outputs connected to the MixBuss so that you're
always monitoring the output of the externally summed mix. If
you keep it connected in this way, then you'll always be
hearing exactly what is summed from the Mixbuss, and no further
tweaking will be required.
One final note. If you tend to run your stems fairly
hot to ensure the highest signal-to-noise ratio on output
of the DAC converters from your interface, you may run the
risk of overloading your inputs when recording your externally
summed mix. Not to worry. All you need to do
is adjust the Mix Level output so that the inputs are no
longer overloading when recording. This gives you the
advantage of being able to tweak the output signal without
affecting the unity gain relationship you established when
calibrating the unit, thus ensuring optimal signal processing
while operating the
unit.
| 